Dutch Oven No-Knead Bread

This dutch oven bread recipe is perfect if you want to make delicious artisan bread with very little work! Enjoy the crispy crust and the soft, tender crumb.

Dutch Oven No-Knead Bread

Yield

1 loaf 1 loaf

Difficulty

Easy Easy

Prep Time

35 min 35 min

Bake Time

45 min 45 min

Proof Time

n/a 8 min

Rise Time

1 hour 30 min 1 hour 30 min

Right arrow icon

Select Your Yeast

RapidRise® Instant Yeast
Active Dry Yeast
RapidRise® Instant Yeast
Active Dry Yeast

Ingredients

  • 4¼ cups (500 g) all-purpose flour (plus additional for shaping)
  • 1 packet (2¼ teaspoons) Fleischmann's® RapidRise® Instant Yeast
  • 1½ teaspoons (9 g) salt
  • 1 teaspoon (2 g) granulated sugar
  • 1¾ cup (420 g) warm water (100–105°F)
  • 4¼ cups (500 g) all-purpose flour (plus additional for shaping)
  • 1 packet (2¼ teaspoons) Fleischmann's® Active Dry Yeast
  • 1½ teaspoons salt (9 g)
  • 1 teaspoon (2 g) granulated sugar
  • 1¾ cup (420 g) warm water (100–105°F), divided

Directions

  1. Preheat oven to 450°F.
  2. While the oven is heating, cut a piece of parchment paper so it fits snuggly into a 6-qt. dutch oven (the corners can cover the inside of the pot but should not come up beyond the top edge). After sizing it, remove the parchment paper and place the dutch oven only into the oven to preheat it. This will ensure the bread has a nice crust.
  3. Prepare the dough. In a large bowl, combine the flour, yeast, salt, and sugar with a wooden spoon. Mix for 5 minutes to ensure all the dry ingredients are evenly distributed.
  4. Add the 100°F water and mix in with the dry ingredients until a wet dough forms. Mix for 2–3 minutes folding the dough over so any flour stuck to the bottom is incorporated. (An additional 1–2 tablespoons of water may need to be added to the dough to ensure all the flour is incorporated.)
  5. Cover the bowl with plastic wrap and let it proof in a warm spot (70–75°F) in your kitchen for 45–60 minutes. It should roughly double in size.
  6. After this first proof, remove the plastic wrap and sprinkle the top with 3 tablespoons of flour. Using your hands coated in flour or a silicone bench scraper, fold the dough over 4–5 times so it becomes easier to handle.
  7. Sprinkle an additional 3 tablespoons of flour across the cut parchment paper. Gently place the dough onto the center of the parchment paper and sprinkle the top with another 2–3 tablespoons of flour. The dough should settle into a roughly 8-inch boule (round loaf).
  8. Gently place a piece of plastic wrap over the floured dough ball and let proof for another 25–30 minutes. The dough will rise and expand slightly.
  9. After this second proof, gently remove the plastic wrap from the surface of the dough. Carefully remove the hot dutch oven from the oven. Using the parchment paper to move the dough, carefully place the parchment paper and dough into the preheated dutch oven. Be careful to place it directly in the middle.
  10. Place the top back on the dutch oven and put it back in the oven to bake for 30 minutes.
  11. After 30 minutes, remove the lid of the dutch oven and let the bread bake for another 10–15 minutes or until the crust is a dark golden brown.
  12. Remove the dutch oven from the oven and take out the bread, remove it from the parchment paper, and place it on a wire rack to cool completely before slicing.
  1. Preheat oven to 450°F.
  2. While the oven is heating, cut a piece of parchment paper so it fits snuggly into a 6-qt. dutch oven (the corners can cover the inside of the pot but should not come up beyond the top edge). After sizing it, remove the parchment paper and place the dutch oven only into the oven to preheat it. This will ensure the bread has a nice crust.
  3. In a glass measuring cup, add ¾ cup of the 100°F water from the recipe, 1 teaspoon of sugar, and 1 packet of Fleischmann's® Active Dry Yeast. Stir to combine. Set aside for 6–8 minutes to allow the yeast to activate and bubble up.
  4. While yeast is proofing, in a large mixing bowl, combine the flour and salt with a wooden spoon and stir well to ensure salt is evenly distributed.
  5. After proofing the yeast, make a well in the middle of the dry ingredients. Pour in the yeast mixture and the remaining 1 cup of warm water. Mix until a wet dough forms. Mix for 2–3 minutes folding the dough over so any flour stuck to the bottom is incorporated. (An additional 1–2 tablespoons of water may need to be added to the dough to ensure all the flour is incorporated.)
  6. Cover the bowl with plastic wrap and let it proof in a warm spot (70–75°F) in your kitchen for 45–60 minutes. It should roughly double in size.
  7. After this first proof, remove the plastic wrap and sprinkle the top with 3 tablespoons of flour. Using your hands coated in flour or a silicone bench scraper, fold the dough over 4–5 times so it becomes easier to handle.
  8. Sprinkle an additional 3 tablespoons of flour across the cut parchment paper. Gently place the dough onto the center of the parchment paper and sprinkle the top with another 2–3 tablespoons of flour. The dough should settle into a roughly 8-inch boule (round loaf).
  9. Gently place a piece of plastic wrap over the floured dough ball and let proof for another 25–30 minutes. The dough will rise and expand slightly.
  10. After this second proof, gently remove the plastic wrap from the surface of the dough. Carefully remove the hot dutch oven from the oven. Using the parchment paper to move the dough, carefully place the parchment paper and dough into the preheated dutch oven. Be careful to place it directly in the middle.
  11. Place the top back on the dutch oven and put it back in the oven to bake for 30 minutes.
  12. After 30 minutes, remove the lid of the dutch oven and let the bread bake for another 10–15 minutes or until the crust is a dark golden brown.
  13. Remove the dutch oven from the oven and take out the bread, remove it from the parchment paper, and place it on a wire rack to cool completely before slicing.

Tips

Line your dutch oven with parchment paper to simplify the process of removing your bread and cleaning the pan.


Notes

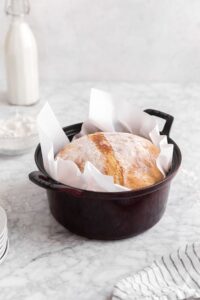
For the dutch oven, use a 6-qt. dutch oven and ensure that the lid and handles are oven safe.

you may also like